Recently Rated:
Stats
Category: Photography
I'm very slowly building a site in my spare time to put all my own stuff on and Ceri asked to re-post the post I did today on my studio set up to shoot the Lamb Argenteuil he did for St David's Day, so here's that post, from randomgaab.blogspot.com.
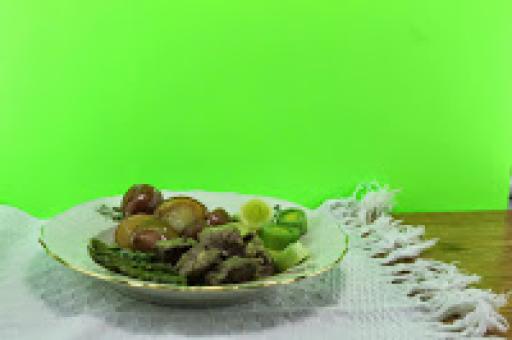
March 1 is Saint David's Day, the national day of Wales, and my partner and I run a Welsh-American social network site, so this date has to be a big deal for us. This year, Ceri decided we should do a recipe for Lamb Argenteuil on the site, which he liked as a special indulgence for St. David's Day in Cardiff. Ceri made it and I had to get a photo to go with his text, and this is it:

My photography "training" was mainly limited to what I needed to study multimedia, so it's all digital and heavy on fixing things in graphics programs like GIMP or Photoshop. I'm otherwise self taught and I mainly focus on images for the web, for clients' websites, for our own and for stock photo sites. I'm better with Photoshop than I am with filters and I don't have the kind of education, equipment and studio set up that an artist like Glyn Davies has.
However, I love DIY. I love figuring out how to make things myself, I love hacking an idea and figuring out how to repurpose objects. My idea of shopping is the hardware store, the thrift store and the art supply store. An unfortunate side effect is that my space is full of piles of random odds and ends and I have to argue their value, and that I am NOT a hoarder! , with other people.
Ceri was going to make this dish for dinner, so it would be in the evening, long after good light has fled. At first, I wanted to try to make a light tent or light box, which is a cube frame with white fabric and lights outside it, the item you want to shoot is set inside, like this super cute, pop-up light tent, shot by Marc Carlson on Wikimedia Commons:
To reproduce this effect, I made a cube frame out of pvc pipe cut to 2'x 2', covered it with a white, cotton sheet from a thrift store and used three mechanic's lights with 32W CFL bulbs - one on each side and one on top. That still didn't look right and I didn't want a solid-colored background, so I built the set up, below, while Ceri was cooking:

Years ago, I saw and coveted the Lowel EGO Digital Imaging, Tabletop Fluorescent Light Unit but couldn't afford to buy them, so I made my own version. Lowell lights are good and I'm sure theirs are a lot better than mine but, until I can afford them, mine will have to do. My lights are on either side of the pvc cube in the shot, above. To make them, I bent a piece of corrugated plastic (such as you would use for political signs stuck on wires in the dirt) at about a 100 degree angle. I unwound and cut a wire hanger in two halves and used the halves as braces at the top and bottom of the plastic sheet to hold it in place - poke the ends into the last hole of your corrugated plastic sheet. I used half a sheet of plastic light cover (as you'd find in a fluorescent ceiling light) bent across the front of the corrugated sheet as the diffuser in front and anchored it all with clear duct tape. Then, just cut a hole in the back and put your light socket through it. Two lights are better than one so I used a twin socket adapter like this one.

I always use CFL bulbs as they are cool and won't melt or set your diffuser on fire, if you're setting your light close or even right on top of it. I haven't tried LED lights yet, that might be even better than the CFL and, of course, those are also cool. There's probably a better material than the plastic sheet I used for the diffuser - this stuff is annoyingly brittle and prone to shattering so be careful when you're cutting and especially bending it. I used a very fine tooth jigsaw and went slow, as though I were cutting bread and I shattered two of them trying to bend it to fit my frame, so go very slow on that.
I used plastic clothespins from the dollar store to attach a square of white sheet to the top of the pvc cube frame, pulled very tight so I could put a mechanic's light right on top of it to shine down on the plate.ppI wanted something more exotic than the dark window behind my worktable so I made a cheap chroma key screen with a sheet of acid green poster board attached with spray mount to a sheet of foam board from a dollar store. This allows you to select that horrible green in GIMP or Photoshop or whatever program you're using for editing and replace it with something else. For this to work best, there can't be any shadows or any tints or shades on your background but that horrible green, so be sure to smooth it out and get rid of any wrinkles or bubbles, which is why I recommend using something like spray mount instead of glue. The "table" underneath the plate is another sheet of foam board, covered in faux wood-grain shelf liner, also from the dollar store.

If this is all too much fiddling and you're not into DIY but you still want to try some tabletop photos, Amazon has this pretty cool looking light tent and lights kit.
Ceri brought me the plate and it looked delicious but I knew it wouldn't come across sexy enough in the shot. There would be too much reflection of the green background, the potatoes and asparagus would be dull and matte, it really needed to be brightened up but we also had to eat it as it was thirty bucks worth of lamb, so no spraying the food with glycerin to make it look better. I covered the potatoes and asparagus in melted butter and shot fast, before it set up, and then went in to edit in Photoshop.ppThe first thing was to duplicate the original image layer - always save your original image layer untouched, applying "no pixel shall be harmed," so you have it, unaltered, if you need it. I then hid the original layer and used the magic wand tool on the duplicate layer to select and remove the background. I replaced that with a public domain image of Caerphilly Castle from wikimedia commons for the background layer, blurred with the Gaussian Blur filter. I used the blur tool on edges of the plate and the "table" where they met the background to reduce that unnatural pop-out effect.
That bright green background turned out to really adversely effect colors in the image. I adjusted hue and saturation of the meat and potatoes to reduce the reflection of the original green background and pop them out more, adding more blue and reducing the yellow. I did the same to the plate to reduce reflection of the original background in the white of the plate and lowered its saturation to further get rid of the reflection, and to reduce it as a focal point in the picture, letting the food stand out. I didn't do this to the entire image as I liked the green on the leeks, asparagus and the asparagus cream sauce on the meat, and I wanted to keep that.
I think the final version came out in sort of an early 70's cookbook style, as though the next page ought to be green olives and tuna in tomato gelatin or something. You can see the before editing on the left, and the after editing on the right.
 |
 |
If you'd like to try your hand at Lamb Argenteuil, Ceri's recipe is here .
If you like the idea of olive, tuna and tomato Jello-o salads, don't despair .
Back to Welsh Literature page >
As I was lucky enough to be building the ebook for this, I got to read them all and this book is absolutely awesome.
Poet and reviewer Marc Mordey posted this review on his blog:
"I remember reading , and thoroughly enjoying, Lloyd Jones novel, ‘Mr Vogel’ and making the mental note that ‘I must read more of this man’s work’..but then, somehow, the opportunity has not arisen (or I have not made it happen).
"Just lately I was gifted a copy of Mr Jones’ new collection of poetry – ‘The Secret Life of a Postman’, and what a fine present this has turned out to be.
"I have been working my way gradually through this impressive selection of poems – it is a big volume and there is a deal of complexity in the words and rhythms of the poet : not a book to be absorbed at one reading, but a delightful, literary chocolate box to dip into and relish (and we are talking high end confectionary here!)"
This is all true and I can't recommend it highly enough. When I was working on this, I had the daily experience of getting smacked upside the head with meaty, meaningful concepts and imagery that I had to go chew over, that made me think and feel, that challenged and elevated me. If you can read, you should read this.
You can get either the ebook direct edition pdf here or kindle for Amazon https://www.amazon.co.uk/Secret-Life-Postman-Lloyd-Jones-ebook/dp/B00NQOEXC8/ref=asap_bc?ie=UTF8
Roman gold was found under a street in Colchest, Essex, England, which may have been buried to hide it from Boudicca's army:
http://www.dailymail.co.uk/sciencetech/article-2742314/Hiding-bling-Boudicca-Hoard-Roman-jewellery-buried-conceal-queen-advanced-Colchester-unearthed.html
Roman gold was found under a street in Colchester, Essex, England, which may have been buried to hide it from Boudicca's army:
http://www.dailymail.co.uk/sciencetech/article-2742314/Hiding-bling-Boudicca-Hoard-Roman-jewellery-buried-conceal-queen-advanced-Colchester-unearthed.html
Ceri and I were lucky enough to get to hook up with Brian y Tarw Lloyd and his awesome daughter, Breanne Sciaroni yesterday at a couple of pubs in Portland, finishing up at the Horse Brass.
Ceri told them about our video demonstration for the US Ambassador and they both gamely volunteered to perform their versions, below:
The US embassy in London has made and put up this absolutely awesome video on youtube, "America's Welsh Heritage" -
This is actor Dominic Monaghan in an interview about John Rhys Davies playing Gimli in "The Lord of the Rings" series -
I love John Rhys Davies in anything, even godawful horrors like "Sabretooth" -
somewhat shamelessly stolen from: http://thestarcrossedlosers.tumblr.com/post/75576352843/oshkeet-throren-dont-mess-with-gimli-they


This is a pic and directions for Welsh Cakes from Emily Clark, who's in the Welsh language meetup group Ceri and I started going to in Portland. She did heart-shaped Welsh cakes and I thought they looked awsesome. She told me she got a set of varied-size heart cookie cutters at Target and that's what she used, see the picture at the bottom.
WELSH CAAAKES!
I use the recipe from the King Arthur Flour website, but I made a few changes to it that are small but noticeable, so I'll just send you the version that I do rather than link you to theirs:
Ingredients:
- 3 cups flour
- 1 cup sugar 2
- tsp baking powder
- 1tsp salt
- 1 tsp nutmeg
- 1 cup butter (2 sticks)
- 1 cup cranberries (traditionally currants but cranberries are preferred in my house!)
- 1 tsp vanilla extract
- 2 large eggs
Preparation:
- Pop the two sticks of butter into the freezer before you do anything else, because you'll need to grate them and having them frozen makes it a tiny bit less messy (you can not freeze them and cut them into pats when you're ready to add them to the mix, but I find that it's way, WAY easier just to grate them...mixes better).
- beat two eggs into a measuring cup, add vanilla extract, and then add milk until you've got 3/4 cup liquid.
- Mix together dry ingredients (flour, sugar, baking powder, salt, nutmeg).
- Grate one stick of butter into bowl of dry ingredients, then mix together until evenly dispersed/fairly crumbly.
- Grate in the second stick of butter, then mix again until fairly crumbly.
- Mix in cranberries (or currants).
- Add in the egg mixture, and mix until the dough is moistened. The easiest way I've found to do this without having a frustrating, sticky mess everywhere is to pour the mixture in, then turn the dough over and over with one of those long mixing spoons until it's mixed relatively well. Then I use my hands to squish all of the dough together until it's thoroughly moist and you can hold it all in a big ball. I hope that makes sense! It's a lot easier than trying to mix it all with a spoon, trust me.
- Turn your dough out onto a well-floured surface and cut it in half (you have to do this in two parts because it's enough dough to make a TON of cakes. Too much for one go!). Set one half aside.
- Roll out first half of dough until it's about 1/4" thick, then start cutting out your cakes! They can be any shape you want, I typically do circles. You'll have to constantly flour the cutter and the surface of the dough due to the supreme stickiness.
- Once you've got all of your cakes cut out of both halves of dough, start heating your pan. It's supposed to be done on a griddle, but if you don't have one then a skillet should do. We've got a pancake griddle that works perfectly. You want to heat it on a medium low-medium setting (I put it just below the 5, if your stove has numbers).
- Place cakes on the pan, and let sit for about 3-5 minutes depending on the heat of your stove. You'll know when to flip them because there won't be anymore sizzling butter around the bottom edge, and the top of them will be rounded and puffy, without much sweat left on them. When you flip them over, they should be golden brown on the bottom. If not, let the other side cook through and then flip it over again to brown the bottom a bit more, or else they'll fall apart more easily.
- Sprinkle the tops with sugar.
- Brew a pot of black tea, sit back, and enjoy.


